

In this article, you’ll find
- Introduction
- Step-By-Step Guide To Event Registration Software On Shopify
- How To Promote Your Event
- How To Manage Your Attendees
- What To Do On The Event Day
- What To Do Post-Event
- Tips For Future Event Planning
- Event Registration On Shopify Is Easy When Done Right
- FAQs
Introduction
Content Marketing. SEO. Social Media. Organic Marketing. Overwhelming, isn’t it? However, as a retailer, it is vital to choose the right set of marketing practices strategically, to ensure you stand out. But amidst all this, there is one game plan that most ignore: creating events on Shopify.
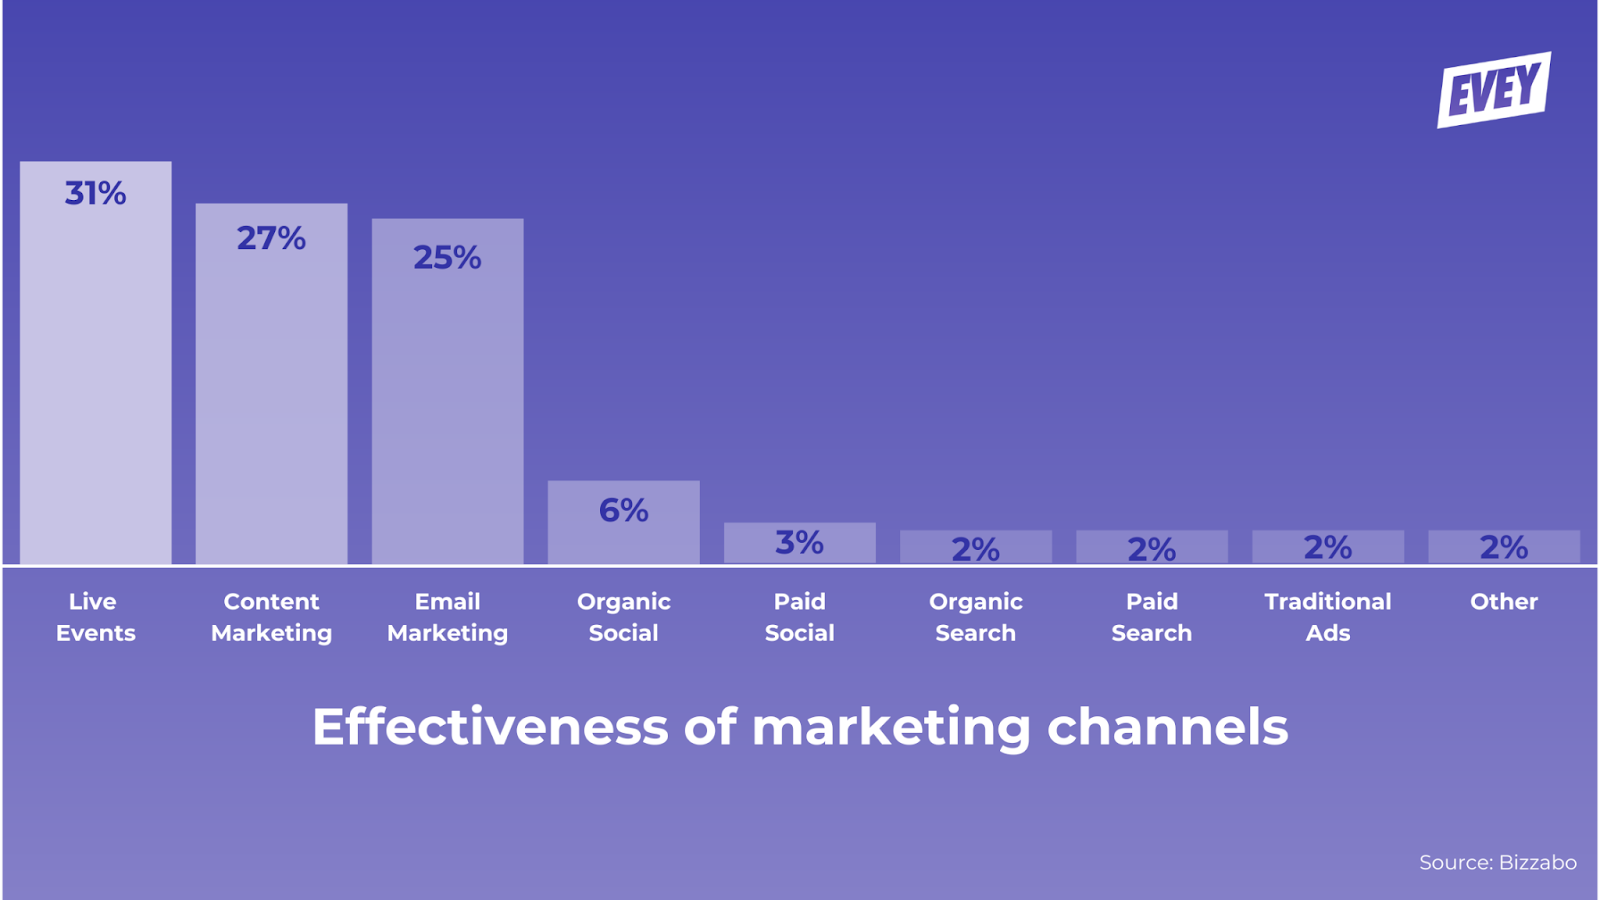
Did you know? 31% of marketers believe event marketing to be the single-most effective marketing channel. Creating events on Shopify can be an excellent way to engage with your customers, drive traffic to your online store, and increase sales. Yes, you can do this with just one simple technique.
So, if you still haven’t tried events to amp up your business, take this as a sign to do so. Don’t worry, we are here to help you out. In this article, we bring you a comprehensive guide to event registration software on Shopify and all the tried and tested tips that can help you out. Just keep reading till the end to know all about it.
Step-By-Step Guide To Event Registration Software On Shopify
Let’s unpack a comprehensive guide to event registration software on Shopify without any further ado.
Before You Begin
To ensure everything goes hassle-free, go through the Launchpad guidelines and limitations on Shopify! Why? Following the do’s and don’ts will ensure your hard work isn’t wasted. Therefore, go through all the rules carefully and keep them in mind as you go on with the process of event registration software on Shopify.
Creating Events Using Event Registration Software on Shopify
Follow the below tips to help you create the event of your choice to elevate your business and reach new heights. Creating event registration software on Shopify doesn’t have to be complicated when you go step by step.
The first step to creating events on Shopify is to choose the right app. It ensures the entire process becomes hassle-free. So, browse the Shopify app store for the perfect event registration app that meets your needs. Evey Events & Tickets is among Shopify’s Top Event Management Platforms. In this article, we will go through how to go about the steps for event registration on the Evey app.
Install And Integrate
To install and integrate the app, go to your Shopify admin panel and click on Apps.
Next, click on Visit Shopify App Store.
Here, search for Evey Events & Tickets.
Finally, click Add App and follow the instructions to integrate it with your Shopify store effortlessly.
Yes, event registration software installation and integration are so easy!
Create Event
To create the event on Evey, click on the Create Event button at the top right-hand side of the
screen
Some of the things you must consider include;
- Give your event an attractive and enticing name to attract your target audience. You want to stand out, and your name should get the job done. However, don’t go overboard. While it is creative, the title should also be able to convey the message you are trying to send.
- Mention the specific date and time for your event. And be clear with the event location. Be specific about the venue and address if it is a physical location.
- Ensure you include a compelling description that thoroughly discusses the event’s Whys and Whats.
- You can also use high-quality images associated with the event, such as banners, speakers, and more.
Configure The Tickets
Set up the ticket types for event registration software on Shopify. For instance, have categories for early bird, VIP, and more. Be specific with pricing, quantities, how many people you can accommodate, benefits, etc.
You must also define any essential variations. For instance, the ticket availability windows if you plan to keep the purchase window open for a limited duration.
You can even make it lucrative for your audience with offers and discounts. For example, you can offer 10% off for the first 100 bookings. This helps you fill in the spots sooner rather than later.
Now that we have covered the basics, here are a few additional customizations you can make on the Settings page.
The first thing you’ll see is the event tab. Here, you’ll find all the information you need to customize your event, including the information you set up earlier. You can change how you want to send your tickets to your customers, and you can add
more ticket types to your event.
You can also customize the look and feel. Customize the event page to match your brand’s look and feel. Make sure you select the colors that align with your brand. Choose the ones that complement your logo and overall aesthetics. Even the fonts you choose should match your brand’s typography. It should not just be readable but also entice the audience. After all, the success of your event depends on your audience.
You can customize the notifications your customers receive on the notifications tab.
Lastly, the check-in tab is where you’ll be able to manage your attendees and make sure
everything runs smoothly on the day of the event. You can even access the check-in
interface from the computer, mobile or tablet devices, and if you do need to integrate any third-party features or apps, you can do that under the Integrations tab
Remember to save your changes as you go to ensure everything applies to your event immediately.
Set Check-out Options
Now that everything is streamlined make sure your checkout options are sorted. Configure check-out settings, including payment gateways and currency. This is crucial, You need a smooth payment option for your event registration software as it ensures a smooth checkout process and keeps your credibility alive.
Test The Check-out Process
Before you go ahead and make the entire event live, test the entire process.
Go through the event registration software set-up from start to finish as the audience and see if every section is working as per your vision. This helps you ensure everything is in order.
Publish The Event
Once you are satisfied with everything, publish the event on your Shopify store with the help of event registration software. Also, it is vital to ensure that the event page is accessible and easy to find.
Monitor Sales
Monitor ticket sales, attendee numbers, and communication through the app’s dashboard. This is a crucial time, and it is essential to promptly respond to all attendees’ inquiries. Otherwise, you may miss out on participants for your event!
These were all the steps to create event registration software on Shopify. Now, let’s understand how you can make your event a hit.
How To Promote Your Event
Below are some of the best ways to promote your event to ensure you get the desired results!
Email Campaigns
Email marketing is old. But not dead. In fact, The ROI of email marketing is also significantly higher than other channels. Therefore, don’t miss out. Use email marketing to uplift the event created on the event registration software.
First, make sure you divide your email subscribers into segments. Do this based on their interests, demographics, and past engagement with your brand.
Why must you do this? It will ensure your emails are highly relevant to each audience group.
Next, creating the best emails that capture your audience’s attention is vital. Some of the tips you can follow include;
- Create a catchy subject line that compels your customer to open the mail.
- Keep it personalized. Make sure the recipient’s name is included.
- The content should be brief and must provide an overview of the event.
- The call-to-action or CTA is crucial as it tells your audience to take the necessary action. So, keep it attractive and ensure it leads to the event registration software page.
- Use banners and attractive graphics that can add visual appeal.
Once you send an email, that’s not the end. As the event date approaches, send reminder emails as well. Try to emphasize all the benefits the event has to offer to encourage your audience to take the necessary action.
Now, don’t go for any generic content. Opt for personalized words based on the recipient’s preferences and interactions. You can also include testimonials from your past attendees to highlight the positive experiences of your event.
Social Media
Did you know? There are 4.8 billion social media users worldwide! So, if you don’t fully leverage social media to promote your events, you are missing out!
But don’t simply jump into it. First, identify which social media platform your target audience prefers. That’s not all. Focus on platforms that align with your event’s theme.
Go for eye-catching fonts, colors, and visuals that lure your audience.
Ensure you include the date, time, location, and a brief description to ensure they know everything about the event.
Try to embrace the trends. For instance, you can opt for reels with trending audio to give it a push. Finally, create engagement posts, such as quizzes, puzzles, and more related to your event to encourage engagement. Some of the tricks you can use include;
- Create a behind-the-scenes video and ensure your audience is involved in your event journey.
- Go for a unique hashtag for your event.
- Try paid advertising to reach your target group if the budget permits.
- Collaborate with influencers and partners to cross-promote your event.
- Be consistent with your posting so you keep your audience hooked.
Content Marketing
You already know that content is king. It is an easy and effortless way to promote your events. In fact, blogs have been rated as the 5th most trustworthy medium that’s helpful in providing online information. Therefore, it is wise to use this element to promote your event and ensure it reaches your audience.
You can write a blog that walks people through the purpose of the event. Here, you can include all the essential details, including how one can participate in the same. However, don’t write just for the sake of creating blogs.
Make sure the content quality is high and adds value to your audience. You can point out any takeaways or learning opportunities showcasing a positive experience. You can also plan a content campaign with a series of high-quality, valuable content that can benefit your audience. This encourages your reader to take action.
Crafting informative and engaging blog posts can educate the audience about the event’s value, build anticipation, and encourage registration.
How To Manage Your Attendees
Once your event is published and you have started full-fledged promotions, monitoring the sales and managing the attendees’ numbers is essential. Here, you can use the event registration software’s dashboard to keep an eye on everything.
Analyze the type of tickets that are selling the most. Why? Because it can help you adjust your strategies accordingly. If possible, also analyze attendee demographics to understand your audience better, as this can help you with your future events as well.
What To Do On The Event Day
You want everything to take place seamlessly during the event, whether online or offline. You can use tools available in your event registration software or otherwise to efficiently check in the attendees as soon as they arrive. For instance, you can use QR code scanning to smoothen the entire check-in process and make it effortless.
Also, have room for last-minute entrees. It should be intuitive for both your team and attendees.
Lastly, always have a backup plan. You want to be prepared for any glitches or unforeseen circumstances.
What To Do Post-Event
You must do a few things once your event registration software is successfully concluded. First, make sure you compile all the vital highlights of the events. For instance, you can create presentations from speaker sessions and have recordings or summaries. Why? It helps you with social media engagement to uplift your brand.
You can share the event highlights, key moments, and testimonials on all social media platforms. You can also come up with post-event hashtags. And you can encourage your attendees to post their content using hashtags.
Finally, send personalized emails via event registration software or otherwise to all your attendees, thanking them for their participation. This helps you connect with your audience and create a loyal group.
Tips For Future Event Planning
This one is for you!
Once the event is done, it’s time to plan for future events.
You must take this opportunity to thoroughly review the entire event. Go through the feedback and make a note of all the things you could have done to make the event registration software better.
After all, there is always room for improvement. All the information you collect will be useful for the next event via event registration software. You can also establish a feedback loop with your attendees to help you out.
Finally, stay updated on the industry trends and always be on top to ensure you stand out and gain a competitive edge.
Event Registration On Shopify Is Easy When Done Right
Remember, setting up event registration software on Shopify is effortless. Follow the techniques mentioned above for event registration software, and you are ready.
However, to ensure your event registration software works easily, carefully select the right app, customize event pages, promote through various channels, and effectively communicate with attendees. When all the steps come together, you create a seamless consumer experience.
Finally, leverage attendee feedback and analytics to continuously improve future events. The key to a successful event lies in meticulous planning, thoughtful engagement, and a commitment to delivering value to attendees via the event registration software.
Good luck!
FAQs
How do I create an event on Shopify?
As mentioned in the above blog, creating an event on Shopify is hassle-free. First, download the right app and integrate it with your Shopify store. Next, create the event and customize the page accordingly. For a detailed guide, look at the article above, where we walk you through the important steps to create the event and help you with the right strategies to make your event a hit!
How do I create an event calendar in Shopify?
You can create an event calendar in Shopify using a third-party app that easily integrates with your Shopify store. Some apps you can use are Event Calendar by Webkul, Events Calendar by Thimatic, and Event Calendar App by POWr. Once you have downloaded the app, you can set up the event calendar via the dashboard from your Shopify admin panel.
How do I add an event to my Shopify store?
Go to Shopify admin and click on Settings. Choose Apps and Sales Channels. Here, you will notice an option called Launchpad. Click on it. It opens the App, and now you will see an option called Create Event. Here, you fill in all the necessary details to create the event.
Can you use Calendy with Shopify?
Using the embed option, you can embed the Calendly booking page directly on the Shopify website.

