

Facebook Live is powerful.
It drives 3X more engagement overall, compared to pre-recorded videos. Viewers are also 10x more likely to comment on a live video.
With so much noise on social media, this engagement boost presents an excellent opportunity to build and connect with your audience.
If you want to stream your concert, conference, Q&A, or any other type of event on Facebook Live, you’re at the right place.
Before we begin
Andrea, the owner of Andrea’s Party Planning (a fictitious event planning company) is hosting an offline concert.
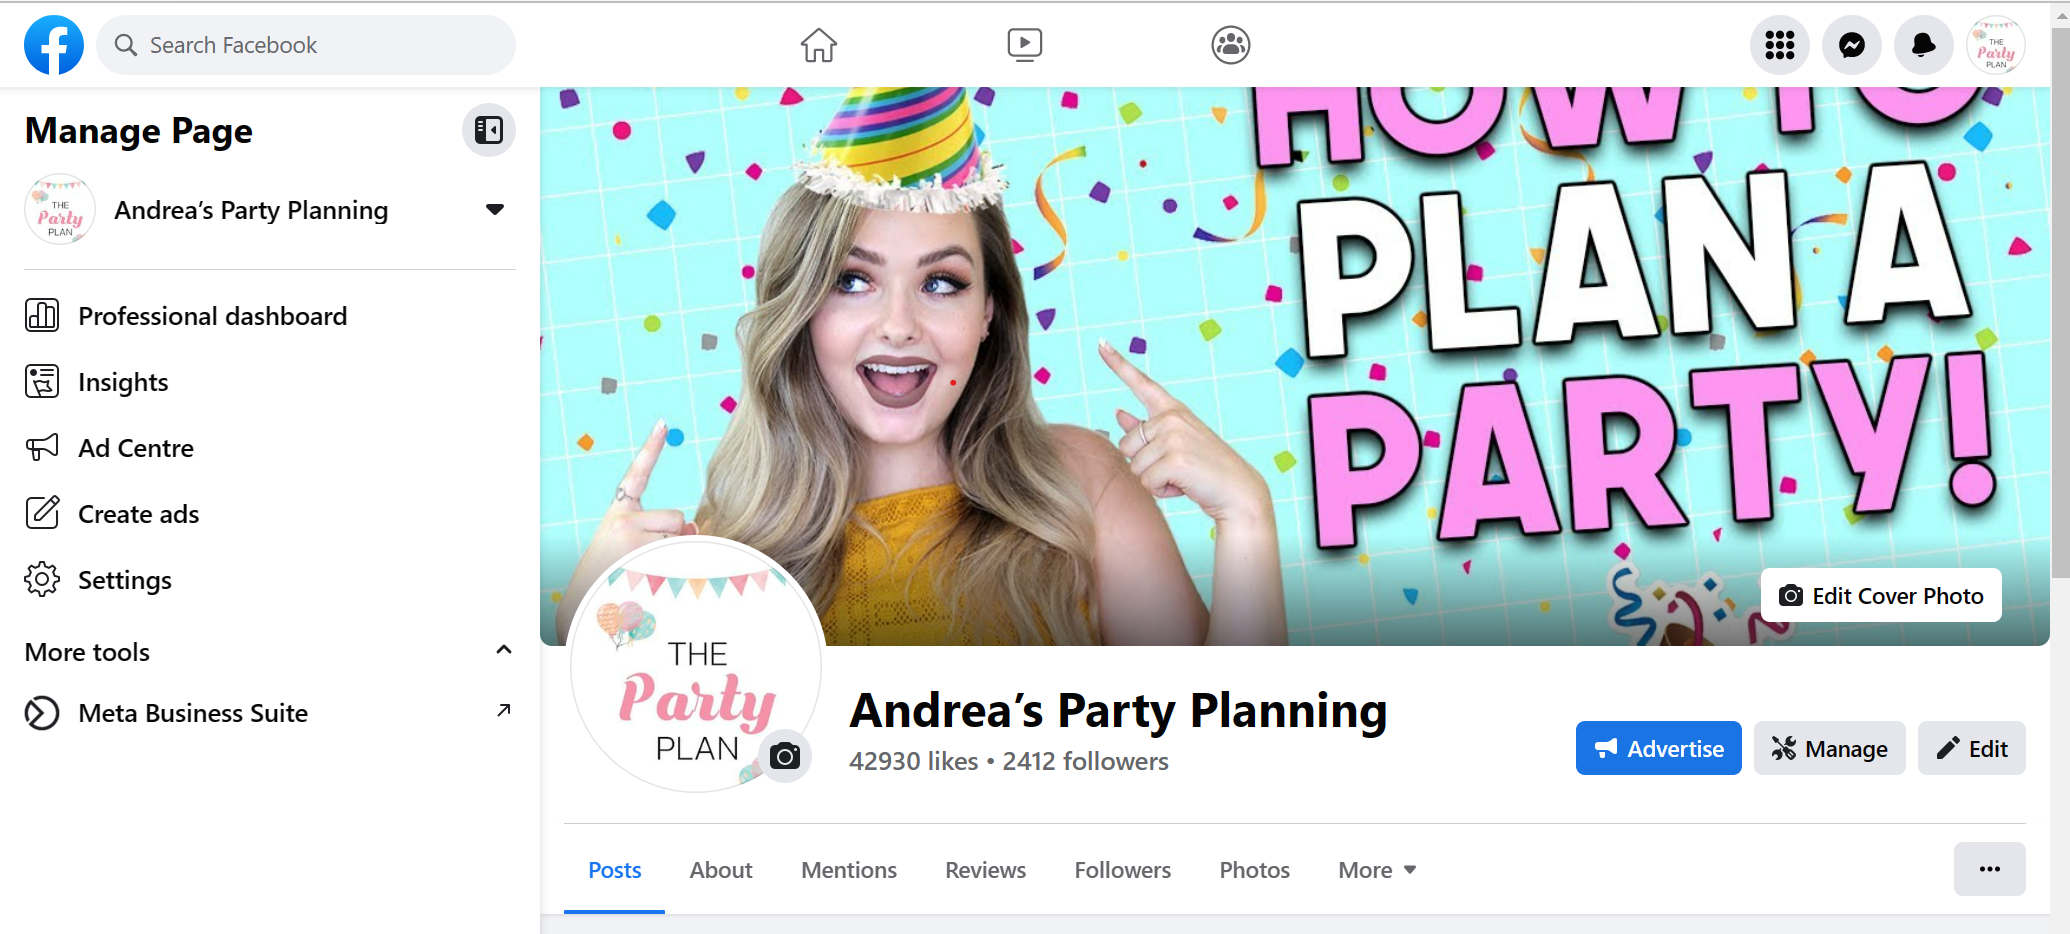
But to capture additional viewers, she decides to stream live on Facebook as well.
There are a few requirements that need to be met to host a Facebook Live stream. Here’s a quick list.
-
The maximum resolution is 720p (720 x 1280), at 30 frames per second.
-
You must send a keyframe (I-frame) at least once every two seconds throughout the source stream to ensure that accurate chunk durations are produced.
-
The recommended maximum video bitrate is 4 Mbps.
-
Audio is required (AAC only).
-
The audio bitrate must be 128 Kbps mono.
-
The audio sample rate must be 44.1 KHz.
-
The maximum length is 8 hours.
-
The recommended projection format for 360 (spherical) video is equirectangular.
How to create a Facebook Live event in two simple steps
With the requirements noted, Andrea is ready to set things up for the concert live stream. Here are the six steps that she’ll have to follow to host her Facebook Live event.
Step 1: Schedule the Facebook Live event
You can schedule a Facebook Live event from your phone as well as the computer. Here are the steps to do so from your computer.
Tap Live from your Feed, business Page, or profile or tap Live video right below the “What’s on your mind?” box.
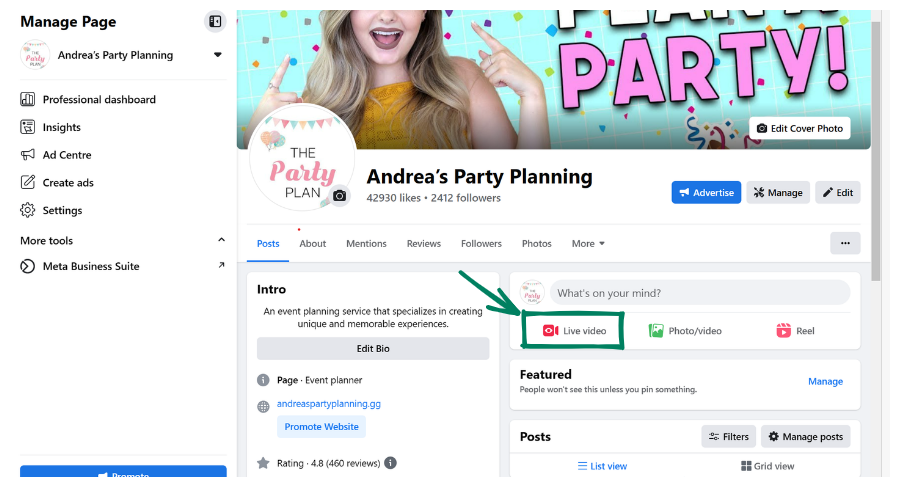
Tap Select in the Create live video event box.

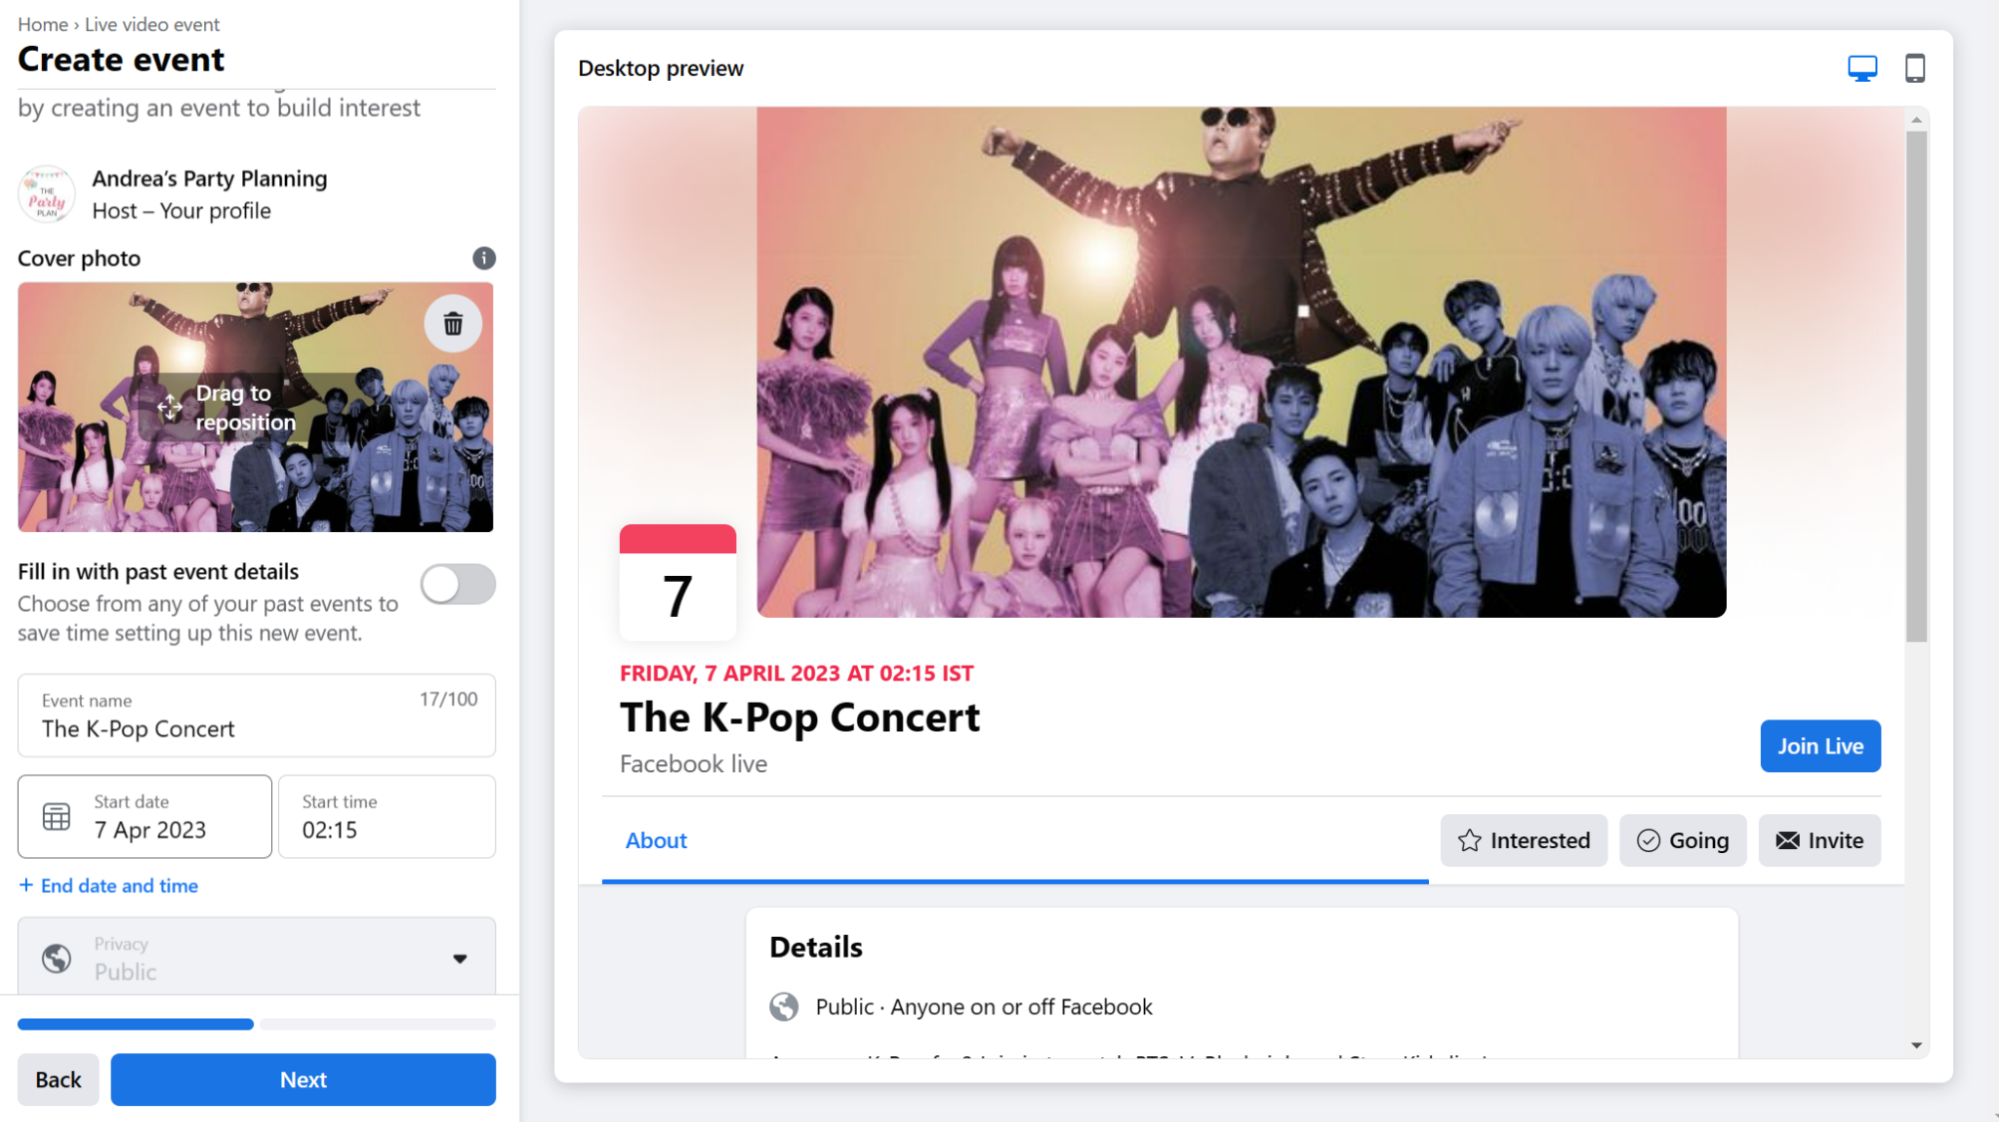
Set the live event name, cover photo, date, and time.
Also, add the description for the event. Paid events are no longer possible on Facebook. If you already have paid events enabled, you can this feature until May 8, 2023.
If you want to host a paid event, here’s how you can sell event tickets on Facebook.
Your event is now set up. Click Next to move to the optional event settings page.

Here you can choose how you want people to engage with your event, communicate with others (or prevent them from doing so), and setup distribution for your event.
Once done, click Create Event and you’re all set up.
Step 2: Stream setup for your live event
Since Andrea is hosting an offline concert that will stream to Facebook Live, webcam streaming will not work for her. But if you’re hosting an online live event, you can run a webcam stream with a single click.

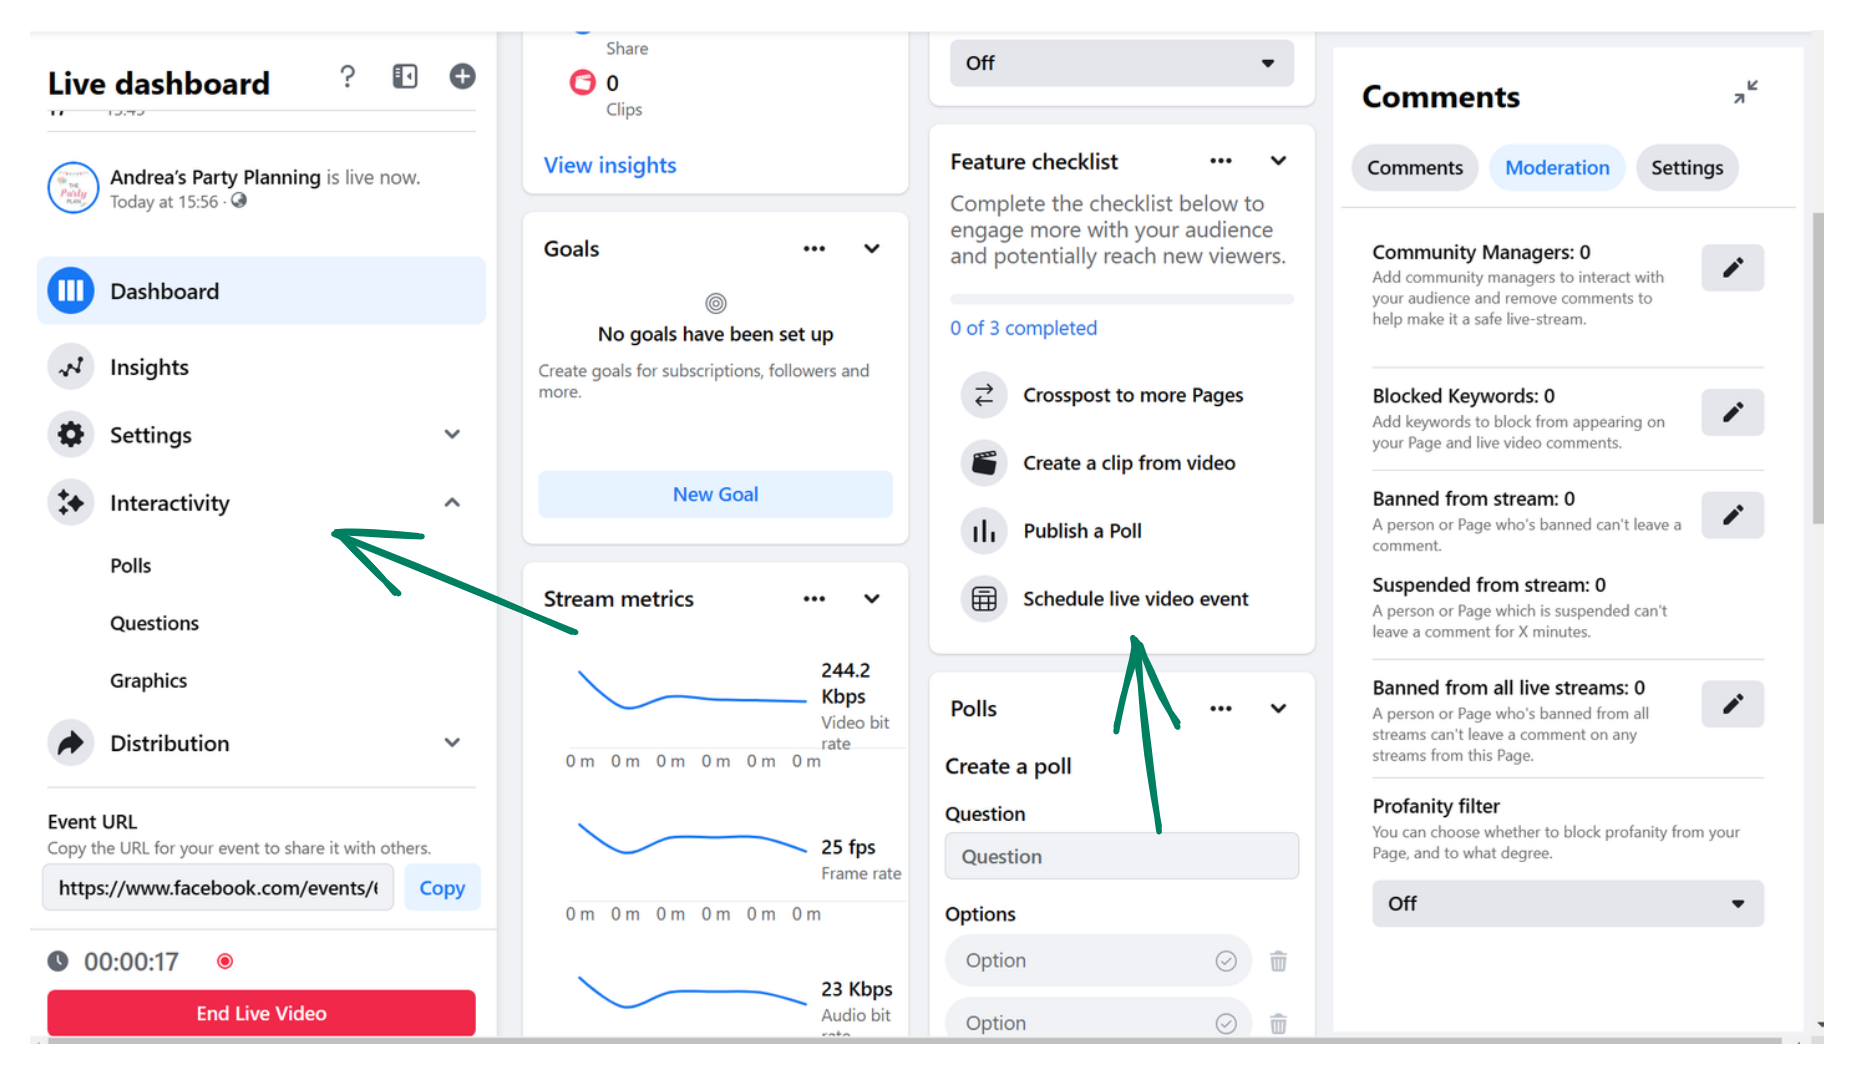
Apart from the video source, you also need to modify the event settings as per your event requirements. Scroll the left panel to find streaming, interactivity, and distribution options.
At the bottom of the left panel, you’ll also see your Facebook Live event URLs that can be shared with your audience.
Once you’re satisfied with the event setup, click Save Changes and you’ll be instantly redirected to the page we started on. Click Scheduled broadcasts to see your events.

Note — When you schedule a Facebook Live event, Facebook immediately posts an update about the event to your feed. A second post is automatically made to your feed when the event goes live.
Step 3: Start sharing with your audience
With the event set up, it’s time to get the word out. Andrea has an audience of 2000+ followers for her page. She can start by leveraging that audience and regularly posting subtle or direct reminders about her event.
We’ll look at event promotion in a bit. For now, you are all ready to get going!
Preparing for your Facebook Live event
Before you stream, ensure that you have the equipment, software, and internet speed necessary for a smooth-flowing event. We do not want unexpected lag or glitches to spoil the experience for our audience.
Here are the few things you need to handle before the event.
1. Equipment needed for Facebook Live
You only need a smartphone, tablet, desktop computer, or laptop camera to get started with Facebook Live.
A basic lighting setup and tripod can also improve the quality of your video. For outdoor events, it’s best to let professionals take over and handle lighting and camera coverage for your events.
2. Testing your wi-fi connection
You need a strong Wi-Fi connection to live stream, so make sure to test your connection beforehand.
Two tools you can use to test your wifi connection:
If you’re away from Wi-Fi, you can still broadcast on Facebook Live if your mobile device has access to a 4G network.
3. Third-party streaming tools for Facebook Live
Paid third-party tools can offer additional features such as screen sharing, multiple presenters, and custom graphics.
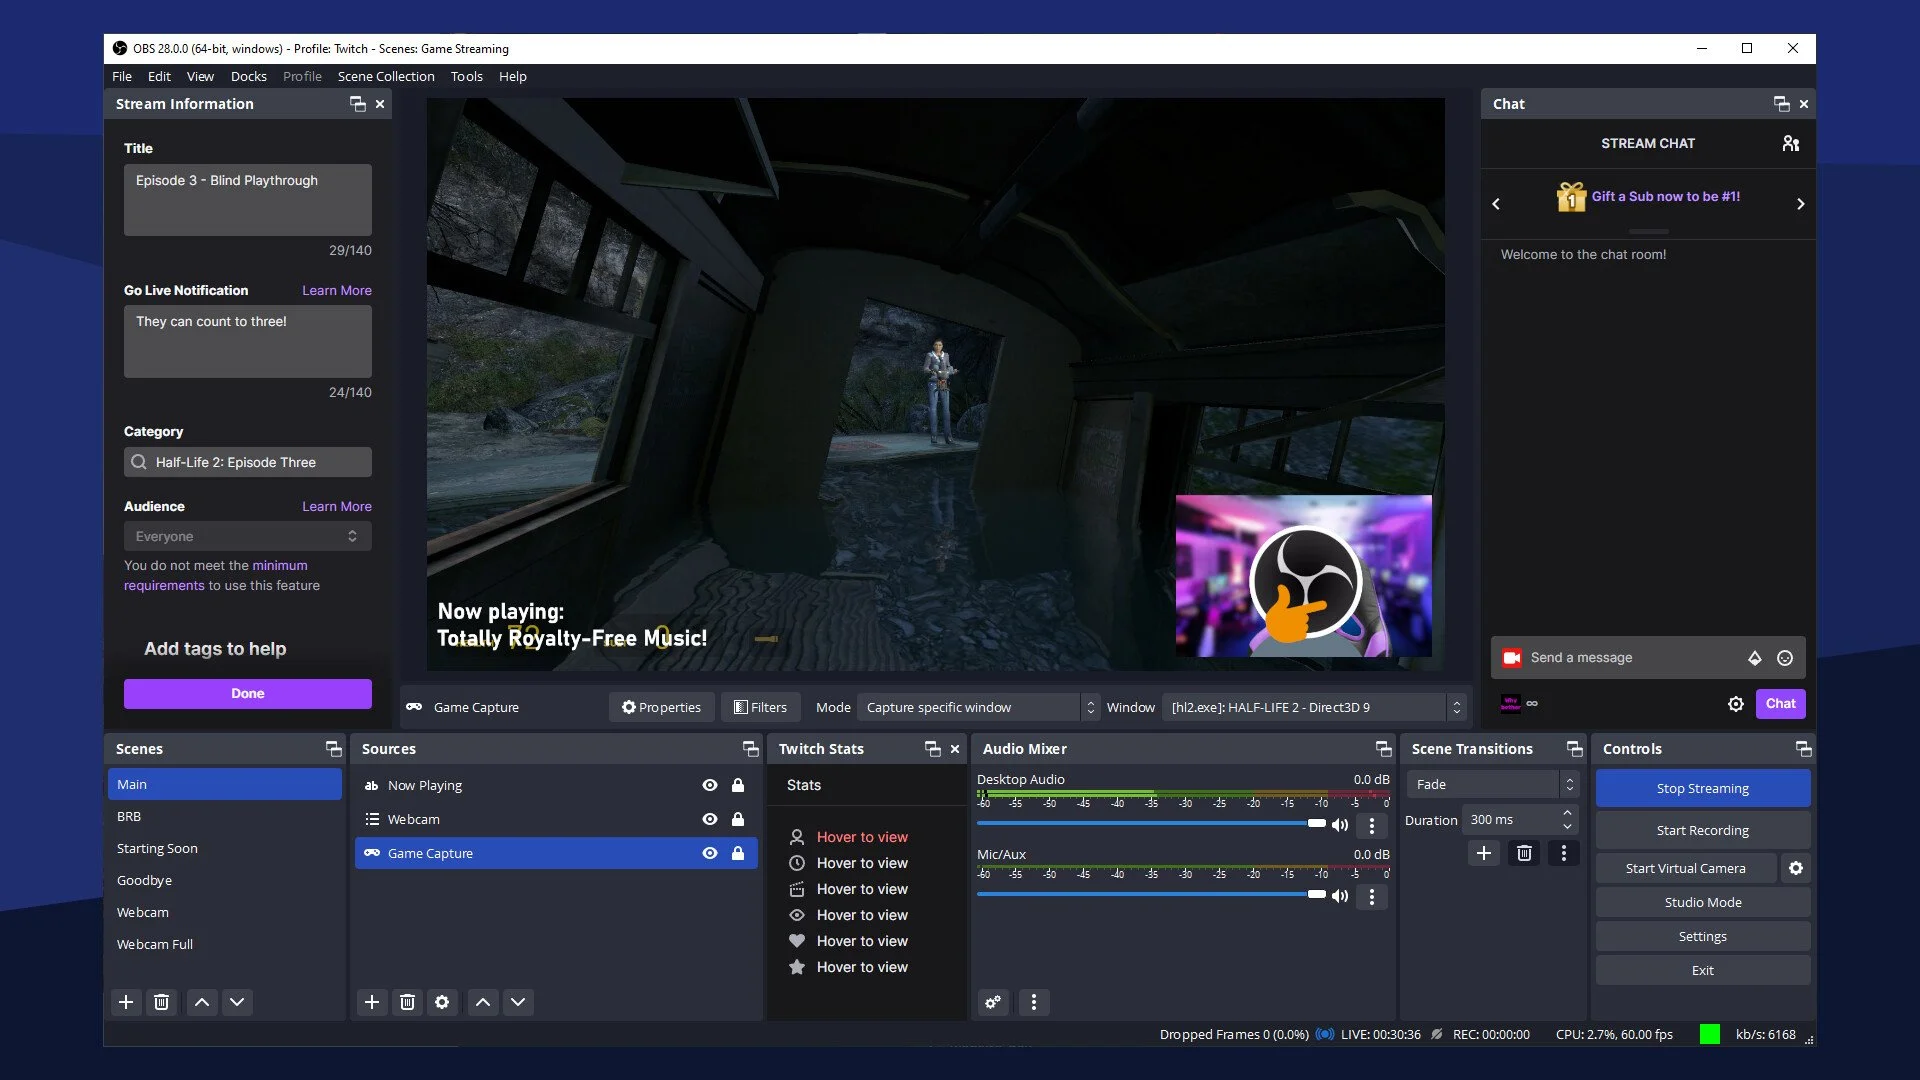
OBS Studio streaming live
Alternatively, you can choose OBS studio to stream live.
4. Planning your Facebook Live broadcast
Think about why you want to do a Facebook Live and how you’ll use the real-time interactivity and engagement features. Consider how often you’ll broadcast and whether to schedule a live video.
5. Setting up your shot for Facebook Live
Be mindful of noise and lighting, use a tripod if possible, and restrict people from entering the area of the shoot.
6. Getting ready to broadcast on Facebook Live
If you choose to stream using streaming software, make sure to have it set up an hour or two in advance. You must only need to hit a button to go live at the time of the event.
Streaming directly from Facebook is much easier. Navigate to your page or profile using which you’ve created your event.
Go back to your Events page and click on the event you created — in this case, the K-Pop concert.

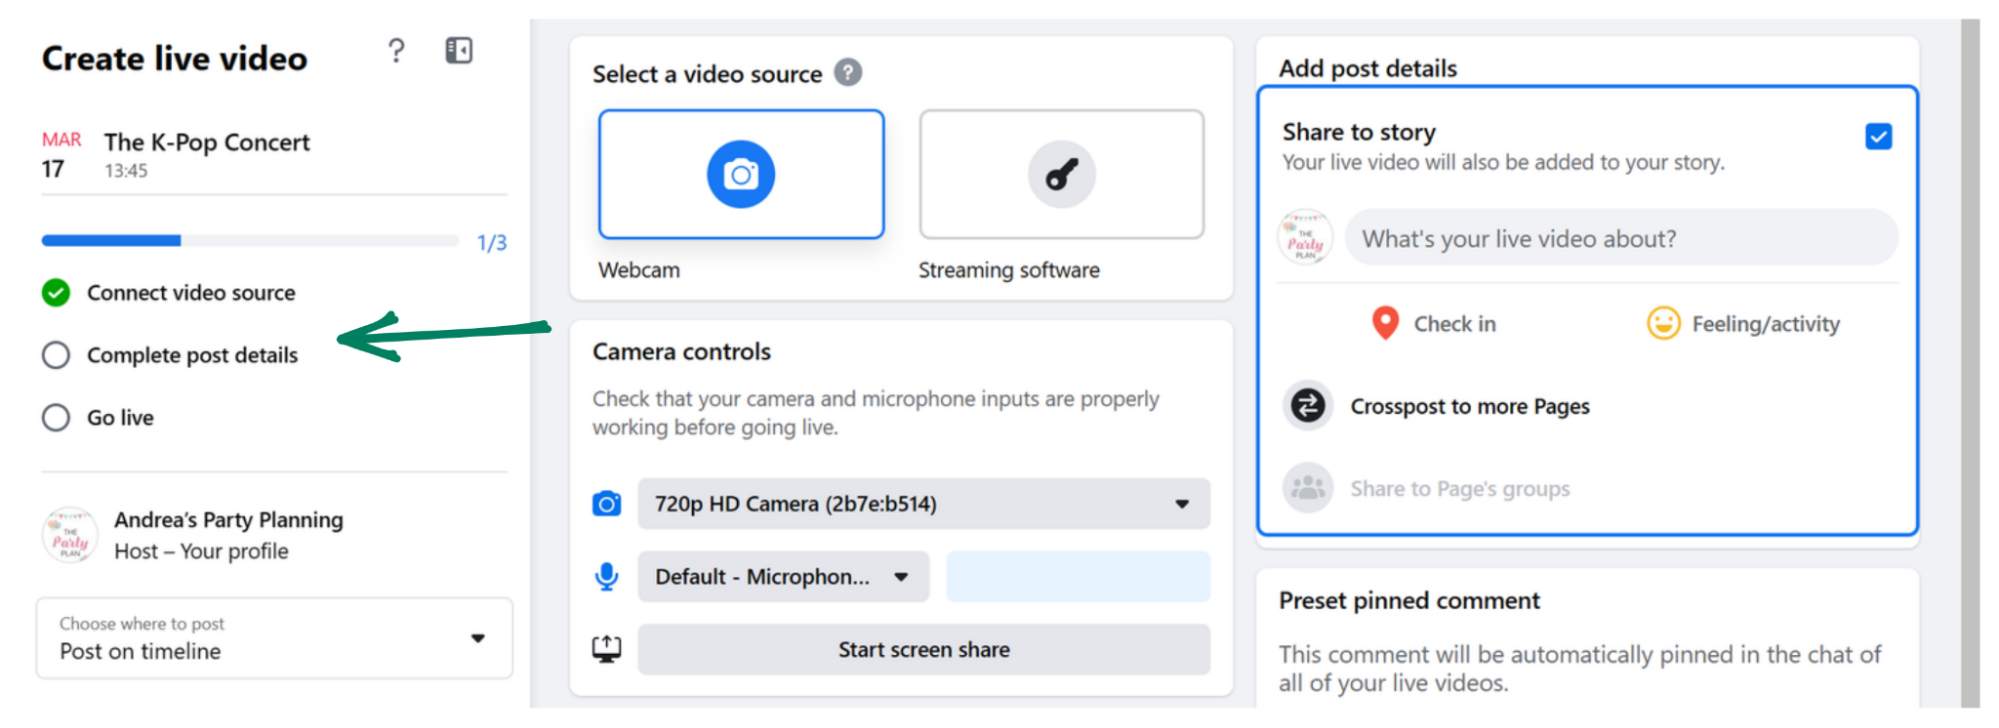
Then, click the Live Video button right under the event banner.

Complete the steps on the left panel—video source settings can be completed from the center panel and the post details from the rightmost panel.

You can also choose to create the post when creating the event to save time later. Once done, click Save Changes at the bottom left of your screen and click Go Live Now to get started!
That’s it, you’ve now hosted your own live event!
What engagement tools do Facebook Live events offer?
With the event setup, you also need to be aware of how you can engage with your audience during the event. Facebook Live events offer a wide range of tools you can use to keep your audience hooked to your event.
Here are some of them:
-
Live Polls: You can create a poll before you go live and get real-time feedback from your audience during your stream.
-
Donations: Nonprofits can add a “Donate” button to their live video, and they get to keep 100% of the donations made through Facebook’s payment platform.
-
Live in Stories: Share your live stream directly to Facebook Stories to reach more of your audience.
-
Featured Links: Add links to your stream to promote a website or other sources.
-
Badges: Fans can earn badges by engaging with your content, which is a great way to measure how much they are enjoying it.
-
Live With: This feature allows you to co-host your Facebook Live video with multiple guests.
-
Live Comment Moderation: Manage the conversation happening in the comments of your live stream by limiting who can comment and how frequently. You can also choose a specific viewer to help you moderate comments.
-
Front Row: This feature lets you highlight your top fans in a special section of your stream and give them a shoutout while you’re live.
-
Live Shopping: If you have products for sale on Facebook, you can showcase them during your live stream.
Promote your Facebook Live event
Setting up the event is just one step. You also need to promote the event to bring in visitors from your audience as well as expand the audience further and beyond.
Here are a few tips to get started with promoting your events.
1. Design a Facebook Frame for your event
A Facebook frame is a creative overlay that you can add to your profile picture or story to show your support for a cause, event, or brand.
You can create your own branded frame for your Facebook Live event and upload it to Facebook’s Camera Effects Platform.
Note that Facebook is now limiting Frame creation to a few approved organizations. Visit the Frame Studio link below and click “Manage Frames” to see if you are able to create frames.
To create a Facebook frame for your event:
-
Go to https://developers.facebook.com/products/frame-studio/
-
Access Frame Studio
-
Under Create a frame, choose Profile Picture

-
Upload your art with a transparent background as separate .PNG Files, which are less than 1MB in size.
-
Adjust the sizing of your frame, and click Next
-
Create a name, choose location availability and schedule, and click Next
-
In the top right corner, select the Profile or Page you want to publish your profile frame, Once you submit your frame you won’t be able to change the frame name or owner.
-
Click Publish
To use a Facebook frame for your event:

-
Search for your frame by name or category
-
Select your frame and click Use as Profile Picture or Add to Story
-
You can also use your frame when you go live by tapping on the magic wand icon at the bottom left corner of the screen and selecting your frame
By using a Facebook frame for your event, you can increase awareness and visibility of your live session. You can also encourage your attendees and followers to use your frame and share it with their friends.
2. Activate an event hashtag
A hashtag is a word or phrase preceded by a hash sign (#) that is used to categorize and organize posts on social media. You can create a unique hashtag for your Facebook Live event and use it in all of your promotional posts.
To create an event hashtag:
- Brainstorm keywords related to your event topic, name, or brand
- Combine them into a catchy and memorable phrase. For example, Andrea, the event planner hosting her K-Pop concert could use #KPopParty
- Check if the hashtag is already in use by searching for it on Facebook and other platforms. Hashtags like domain names should be unique to increase their effectiveness and memorability
- And unlike domains, you cannot buy a hashtag. You can only make it yours by using the hashtag consistently on all your posts
To use an event hashtag:
-
Include it in every post related to your event, such as announcements, reminders, teasers, behind-the-scenes, etc.
-
Encourage your attendees and followers to use it as well when they post about your event or join the live session
-
Monitor the hashtag activity by searching for it on Facebook and other platforms
-
Engage with the users who are using it by liking, commenting, or sharing their posts
3. Share in your email newsletter
If you have an active email subscription base, take this opportunity to promote your event. AdAge ran a vibrant and colorful email newsletter to promote their AdAge Next event.
The newsletter was designed to match not just their website styling which in itself is pretty vibrant, they also added photos of their speakers to increase the value of their event and attract more people to sign up.

Go beyond your regular newsletter styling. Mix and match it with your event style and see people react differently to it. While sending an email invite with your existing styling may work, it will not stop your subscribers from simply hitting the back button.
4. Boost your Facebook Live video with paid ads
If you have a budget, consider boosting your Facebook live video with paid ads. LiveNation regularly runs advertising campaigns for the events that are being hosted.
This ad example of Stevie Nicks is a very good example of bringing attention to the crowd from previous events, her style of music, and the venues—in a short video.

You can target people who are interested in K-Pop, music, or concerts and optimize for video views. This will help your event reach a larger audience and increase awareness of your concert.
5. Embed your video on your website or blog
A lot of event planners have their own websites. You can use the audience visiting your site to your advantage and promote your live event there. Facebook has a step-by-step guide on embedding Live videos on your site.
Here’s a video that’ll walk you through the steps (skip to timestamp 1:00).
If you plan to sell tickets and have a website, don’t let this opportunity slip by. You can start selling tickets using Evey Events, leveraging your existing audience.
Try Evey and experience a new way of selling tickets from your website.
6. Create a status update before going live
Once you’ve taken care of steps 1 through 5, you should have a decent-sized audience (at the very least). You can now start pushing out status updates 1-2 hours before the event goes live to serve as a reminder to your audience.
We want to make it as easy as possible for people who see your status to join the Facebook Live stream. Share links, any support contact details, and other information that users may need to join the event stream.
Deliver an amazing Facebook Live event experience
Facebook Live is an excellent way to generate buzz for your event, showcase brand personality, and offer a personal touch to your audience. But to make the most of it, you need to set it up and engage with your audience effectively.
Don’t let the complexity of setting up and promoting an online event stop you. The simple steps above will help you hit the ground running and set up your event as Andrea did.
Evey helps you with event ticketing, attendee management, and ticket delivery through email and SMS—all from your Shopify dashboard.
This app is exactly what I needed to sell tickets to my event. I had it up and running in 10 minutes and sold 10 tickets as soon as I launched it. The experience is great for the attendees as well with Apple Wallet. Fantastic add-on to Shopify and a must-have for anyone having an event.
Try Evey and experience an event management system that’s more flexible, and cost-effective compared to any other platform out there.

